When building a subscription management app, the first version almost writes itself: three screens — list the services you pay for, remind you about trials that are about to end, and work out what the next round of charges will cost. As screens accumulate, date pickers, currency formatting, and light/dark theming keep changing too. Keeping those changes in sync across three platforms becomes ongoing work of its own.
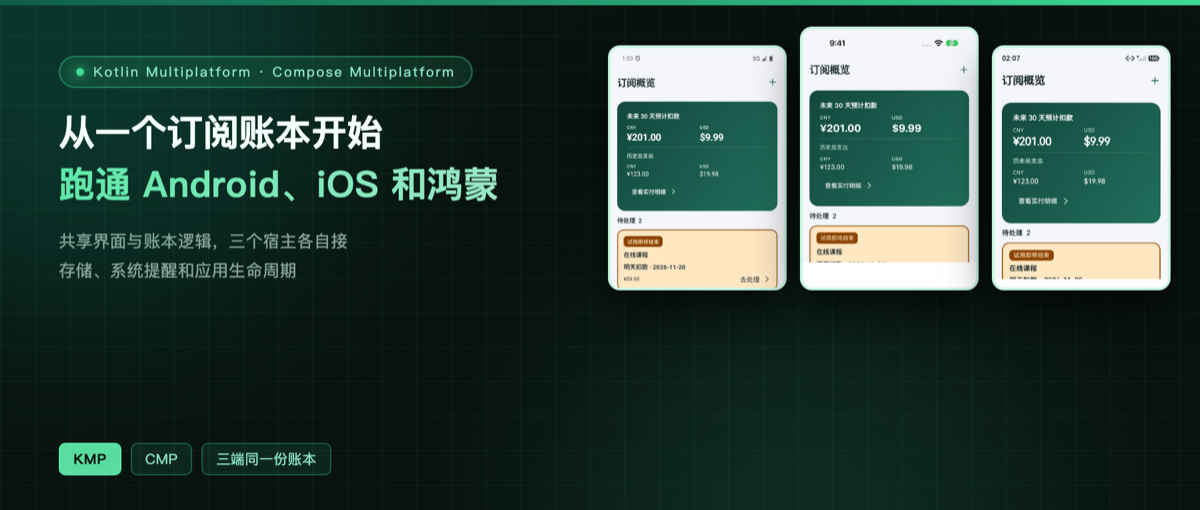
Subtrack shares its subscription model and ledger logic through Kotlin Multiplatform, shares the UI through Compose Multiplatform (CMP), and lets Android, iOS, and HarmonyOS each connect their own storage, system reminders, and app lifecycle. This article walks through that project: setting up the environment, getting oriented in the directory layout, running the app on all three platforms, and then checking actual behavior against a single fictional ledger.
Here is the overview screen running for real. All three screenshots come from live simulators, using the same six subscriptions and eight payment records.
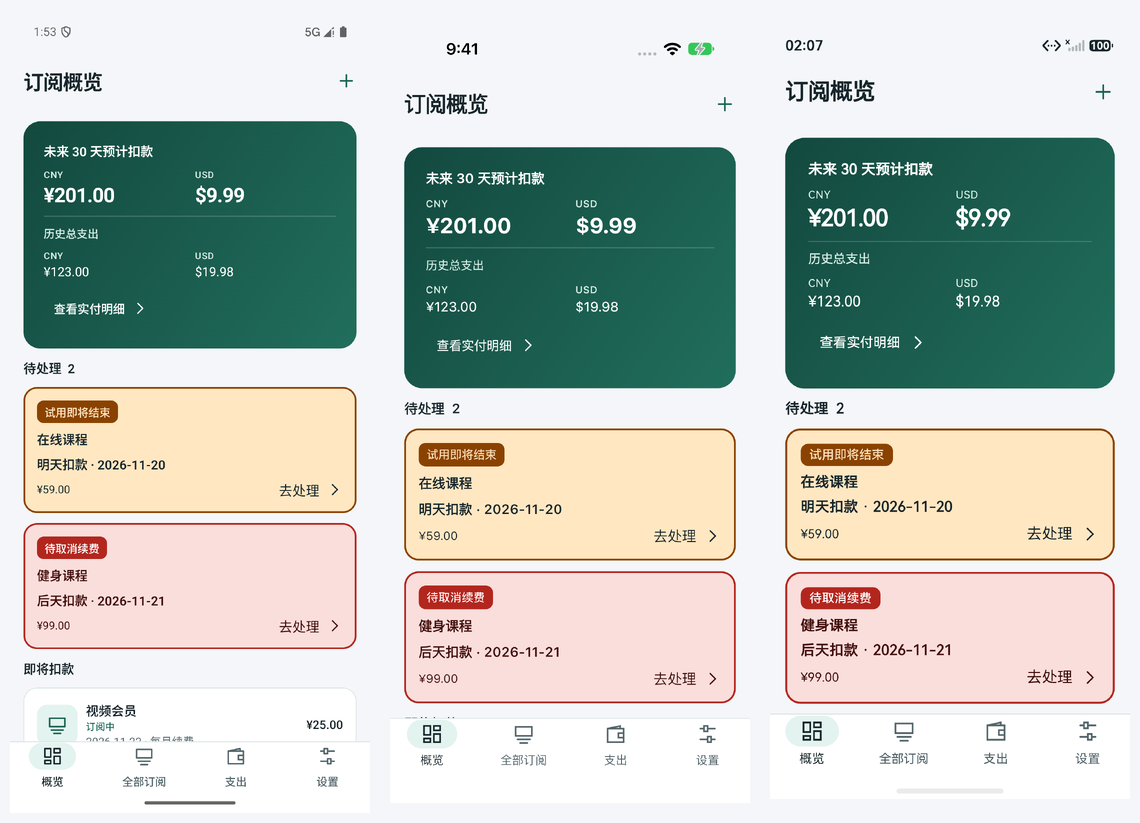
In the image, expected charges over the next 30 days total CNY 201.00 and USD 9.99, while historical payments total CNY 123.00 and USD 19.98. The two currencies are accumulated separately, which makes it easy to check whether the data agrees across all three platforms. All amounts, service names, and payment records in this article are demo data.
Pin down a version that reproduces once
For a cross-platform project, the first build is where the environment eats the most time. The HarmonyOS side of Subtrack uses the adapted builds provided by CPF-KMP-CMP. Stay on the version combination committed in the repository until all three targets are running, then try upgrades one at a time.
The screenshots here were captured on November 19, 2026. The application source baseline is 06cad3d, on the codex/subtrack-cmp-example branch. The HarmonyOS screenshots used a temporary test-data loader, which was reverted after capture. Full image dimensions, file checksums, and capture methods are in the screenshot log.
| Item | Project or actual environment used |
|---|---|
| Kotlin | 2.2.21-1.2.0 |
| Compose Multiplatform | 1.9.2-1.2.0 |
| HarmonyOS OHPM Compose package | 1.9.2-1.2.0 |
| OHOS Skiko | 0.9.22.2-1.2.0 |
| Gradle Wrapper / Android Gradle Plugin | 8.9 / 8.6.0 |
| JDK | 21.0.12.1 |
| Android compile / target / min SDK | 36 / 36 / 24 |
| Xcode / iOS minimum deployment | 27.2 / 18.2 |
| DevEco Studio / local native SDK | 26.0.0.821 / 26.0.0.105 |
| deveco-cli / Node.js | 1.3.0-stable / 26.11.1 |
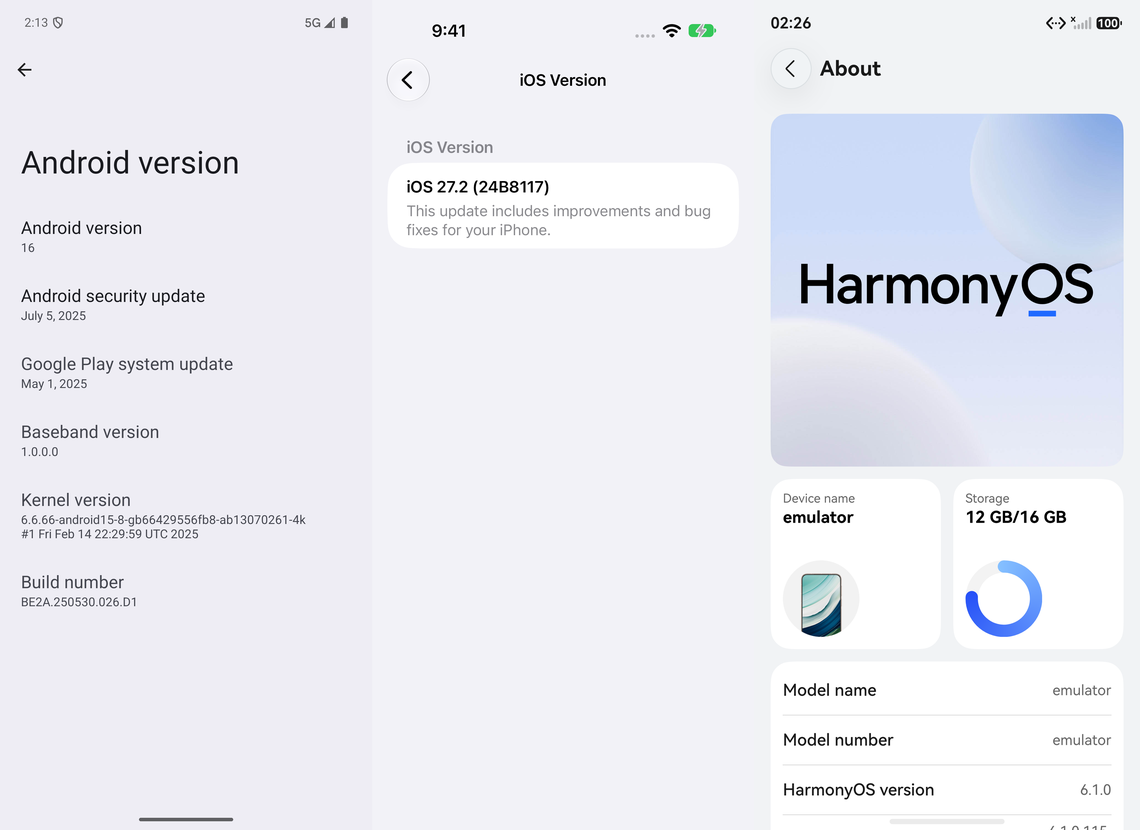
The capture devices were Pixel 9 Pro, iPhone 18 Pro, and Mate 70 Pro simulators, running Android 16 (API 36), iOS 27.2 (24B8117), and HarmonyOS 6.1.0 (API 23) respectively. The locally installed SDKs and the device OS versions are listed separately, so you can pick a target when reproducing.
App versions are 1.0 (versionCode 1) on Android, 1.0 (build 1) on iOS, and 1.0.0 (versionCode 1000000) on HarmonyOS. They come from each platform’s build configuration, while the UI code all maps to the same source baseline.
Below are the software version screens from those devices, which you can cross-check against the version table above.
Know where the shared UI enters
Once you have the companion project, start by locating composeApp, iosApp, and harmonyApp in the root directory. Later we will open the relevant parts with Android Studio, Xcode, and DevEco Studio respectively.
subtrack/
├── composeApp/
│   └── src/
│       ├── commonMain/   shared UI, ledger, amount and date math
│       ├── androidMain/  Android entry point, SQLite, notifications
│       ├── iosMain/      iOS controller, SQLite, Keychain
│       └── ohosMain/     HarmonyOS Compose controller and platform bridge
├── iosApp/               Xcode host
├── harmonyApp/           ArkTS host, RDB and calendar integration
└── supabase/             migrations and tests for the optional sync backend
At the core of the shared code are App.kt and SubscriptionBook.kt. The former composes the overview, subscription list, spending, and settings screens; the latter describes subscriptions, payment records, billing cycles, and status. For amount display, date advancement, and future charge calculation on a given subscription, all three platforms call into this shared code.
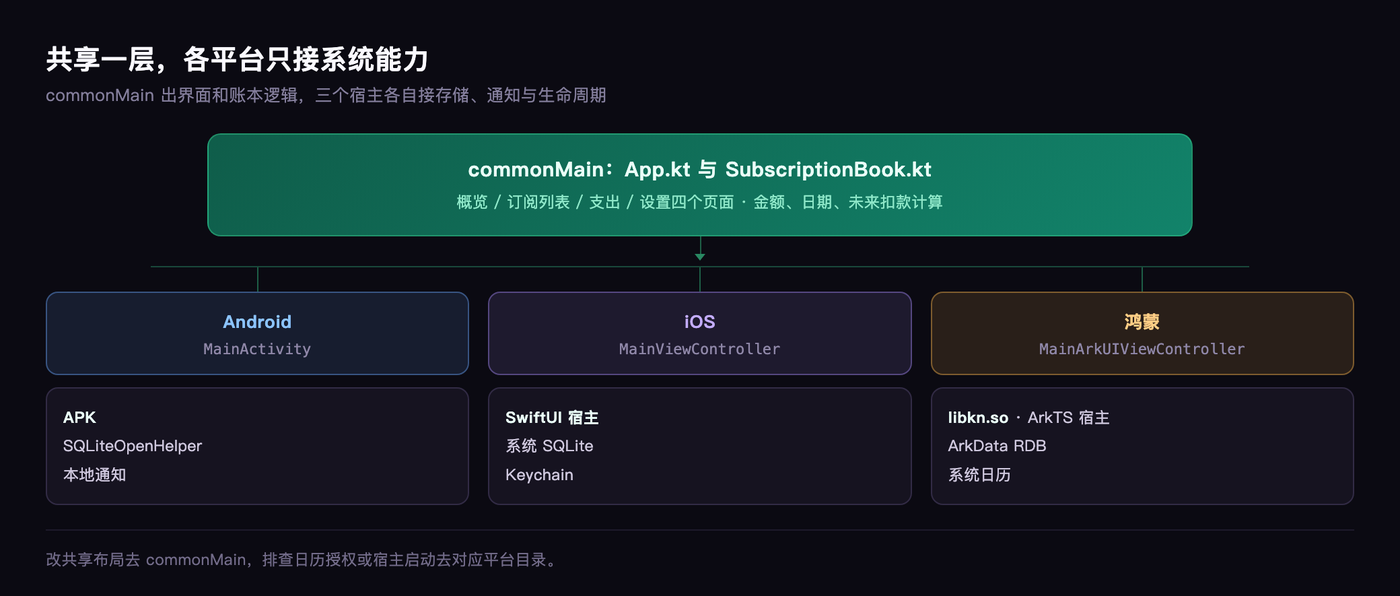
Down at the system-capability layer, the project keeps a per-platform adapter. Android uses SQLiteOpenHelper, iOS calls the system SQLite, and HarmonyOS goes through ArkData RDB from ArkTS. Once you understand that boundary, changes to shared layout go in commonMain, while debugging calendar permission or host startup issues sends you to the matching platform directory — much faster to localize.
Step one: prepare the toolchain and local paths
This article demonstrates all three platforms on macOS. The iOS build depends on Xcode, so prepare a Mac that can run Xcode; you can then compare all three on the same machine.
Install JDK 21 first, then point Android Studio’s Gradle settings at that same JDK. Run the commands below in a terminal to confirm the environment, and always use the Wrapper that ships with the repository.
In the terminal, run java -version and ./gradlew --version to confirm the environment, and always use the Wrapper that ships with the repository.
Next, install Android SDK Platform 36. Android Studio’s SDK Manager will show you where the SDK is installed. Create a local config file named local.properties in the project root and fill in the real paths.
The file holds two lines: sdk.dir=/path/to/Android/sdk and local.deveco.path=/Applications/DevEco-Studio.app.
Both values need to match your own installation. The file is already ignored by Git, which makes it the right place for machine-specific paths. Run Gradle Sync only after the paths are set; if you hit an SDK location error, come back here and double-check first.
HarmonyOS also needs DevEco Studio and the HarmonyOS SDK. Then, in Android Studio, install CPF’s KMP toolchain plugin via Install Plugin from Disk, restart, and sync the project.
For the plugin download link, matching versions, and the UI steps, follow CPF-KMP-CMP’s official quick-start documentation; the project also includes its own HarmonyOS environment notes.
The Gradle scripts declare all three targets, so it is worth having the HarmonyOS environment ready before the first sync. That way, switching targets later reuses the same project configuration.
Step two: run Android first and add a record
Open the project root in Android Studio and wait for Gradle Sync to finish. Create or start an Android emulator, pick the composeApp run configuration, and click Run. You can also build the APK from the terminal first.
To build from the terminal, run ./gradlew :composeApp:assembleDebug, get the device serial with adb devices, then install composeApp/build/outputs/apk/debug/composeApp-debug.apk with adb -s <device-serial> install -r.
The device serial here comes from the output of adb devices. With multiple devices connected, specifying -s explicitly keeps the debug build off the second device. The generated APK lands in composeApp/build/outputs/apk/debug/.
A fresh install starts with an empty ledger. Tap the plus button in the top right, enter the service name, date, billing cycle, and amount, then save. Try it first with the “Cloud Storage” record: amount 18.00, currency CNY, renewing monthly. After saving, go back to the list, open the details, then restart the app and check that the record is still there — that single pass exercises entry, navigation, and local persistence.
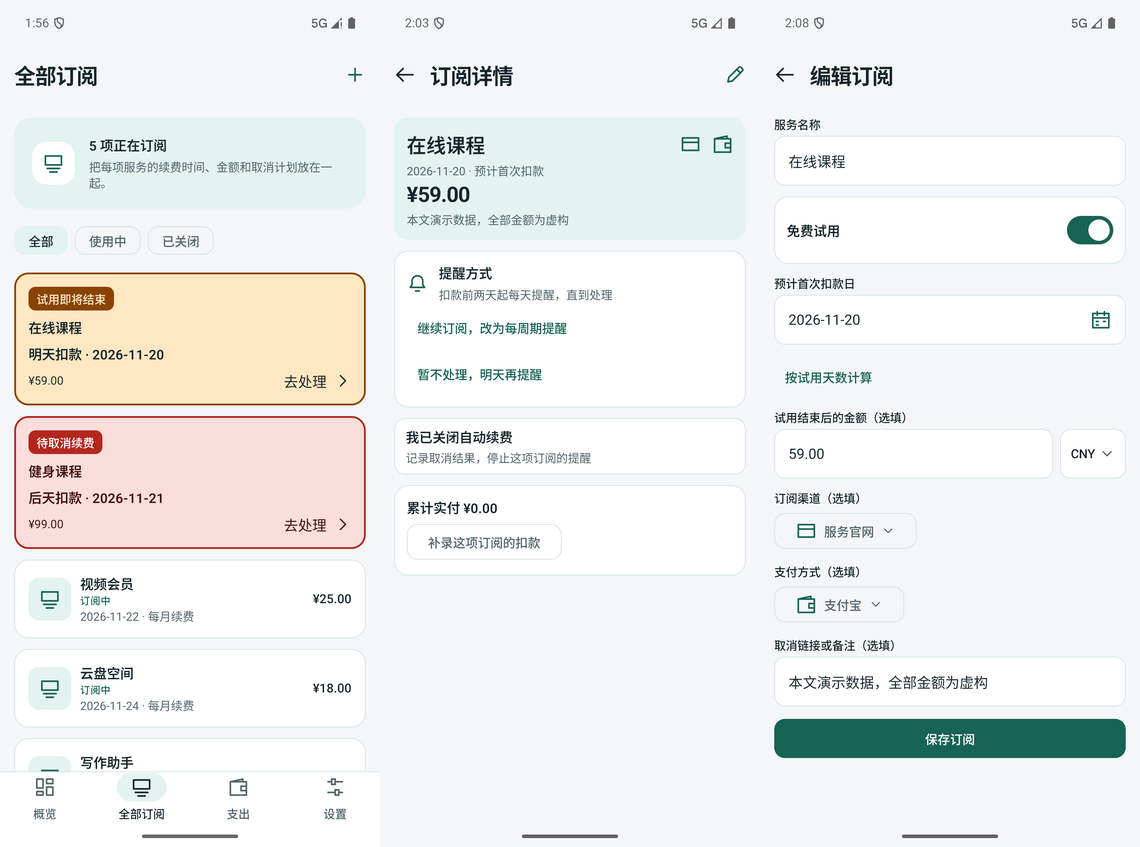
When you enter an amount for real, the decimal value shown in the UI is converted to the currency’s smallest unit. For example, 18.00 yuan becomes 1800 fen, and USD 9.99 becomes 999 cents. The project stores these values as integers and keeps currencies separate when aggregating. That is why the amount field in the test data files uses integers, and needs to line up with the decimal form in the input box.
Step three: bring the same UI into iOS
Open iosApp/iosApp.xcodeproj in Xcode, select the iosApp scheme and an iPhone simulator that meets the minimum deployment version, and hit Run.
This project hosts the Compose controller inside SwiftUI. The current bridging code in ContentView.swift looks like this, with the controller exported from Kotlin.
struct ComposeView: UIViewControllerRepresentable {
    func makeUIViewController(context: Context) -> UIViewController {
        MainViewControllerKt.MainViewController()
    }

    func updateUIViewController(
        _ uiViewController: UIViewController,
        context: Context
    ) {}
}
Xcode’s build phase calls :composeApp:embedAndSignAppleFrameworkForXcode to wire the shared Kotlin framework into the host.
On the first run, two things need to hold for this stage to go smoothly: the terminal can find the JDK, and Gradle can resolve dependencies. When debugging, expand the Compile Kotlin Framework log to find the Gradle task that actually failed.
Once the simulator works, set up signing for a physical device. Put your team and an available Bundle ID into iosApp/Configuration/Local.xcconfig, which Git ignores, then confirm the Signing settings in Xcode.
Two lines in the file: TEAM_ID=YOUR_APPLE_TEAM_ID and PRODUCT_BUNDLE_IDENTIFIER=com.yourcompany.subtrack.
The team and Bundle ID affect device installs, signing, and Keychain access. The ledger screenshots in this article come from the offline screens. Cloud sign-in, the keychain, and background tasks each still need their own verification steps; the project’s verification log keeps the current test results.
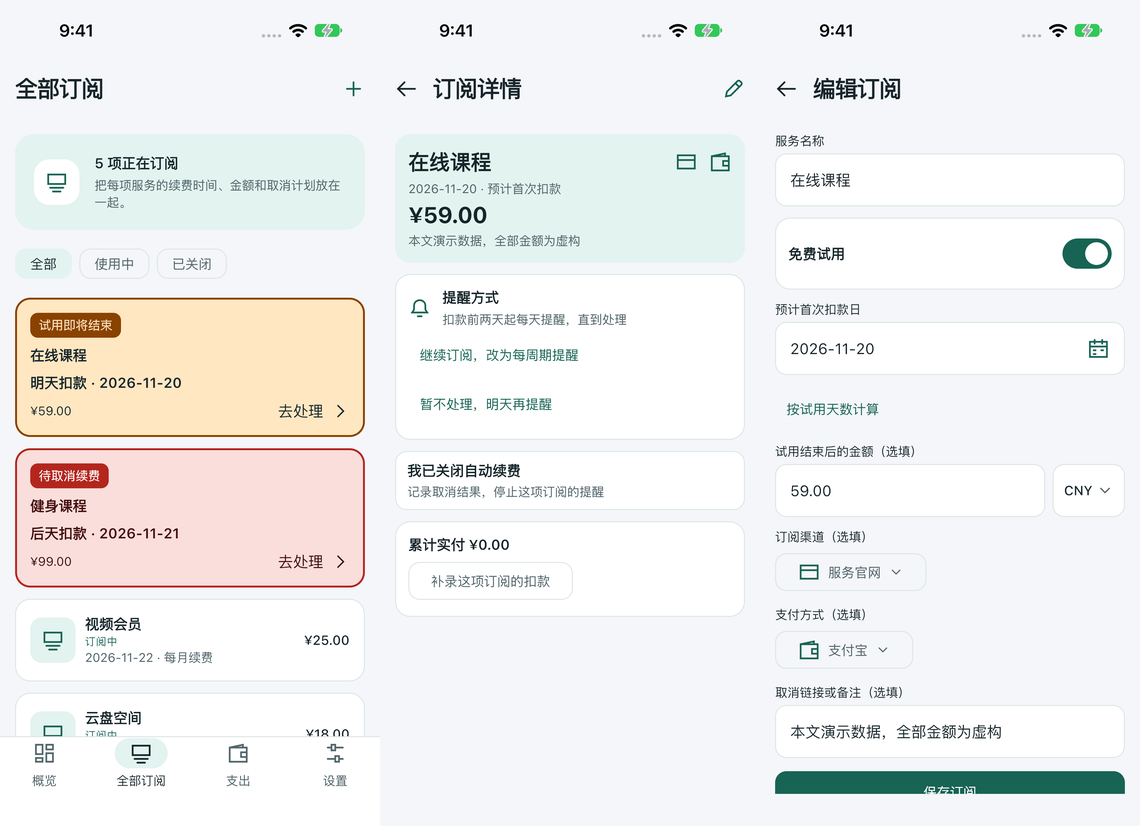
Comparing against Android, you can check card status, amounts, dates, and action labels. Both sides generate that content from the same Composables; the system status bar, safe areas, and host behavior come from each platform’s own environment. The screenshots keep each platform’s full screen so those differences are visible.
Step four: generate the HarmonyOS shared library, then build the HAP
On the HarmonyOS path, Gradle compiles the Kotlin first, then DevEco builds the ArkTS host. Run the shared-library publish task from the repository root.
From the repository root, run ./gradlew :composeApp:publishDebugBinariesToHarmonyApp.
The task compiles both the arm64 and x64 targets and copies libkn.so, the matching libkn_api.h, and the Compose resources into harmonyApp. CMake then links libkn.so into the native entry point, and the ArkTS Compose component hosts the shared screens through the controller.
That also explains why the app needs those .so files: they are Kotlin/Native build outputs and must exist at packaging time. The repository ignores newly generated .so files, so developers regenerate them from source with the task above. After the shared Kotlin code changes, run the publish task again so the HarmonyOS host picks up libraries and headers that match the current edit.
With the shared library ready, open the harmonyApp directory in DevEco Studio, install the OHPM dependencies, and build the entry module. On the command line you need Node.js 22 or newer plus the CLI version used here.
On the command line, install the CLI with npm install -g @deveco/deveco-cli@1.3.0-stable, change into the harmonyApp directory and run ohpm install, then devecocli build --modules entry.
Installing on a device also needs your own HarmonyOS signing. Sign in to your developer account in DevEco Studio, configure signing for the simulator or device, then build and run. The signing configuration is written into build-profile.json5, so review the file diff before committing and keep personal certificate paths and signing material on your own machine.
The device used here is a Mate 70 Pro simulator running HarmonyOS 6.1.0, API 23. The current host’s Index.ets uses libraryName: 'entry', which corresponds to the native entry module name. When chasing a startup crash, work through this order: whether the shared library was updated, whether the headers match, whether native initialization completed, and whether the ArkTS controller was created.
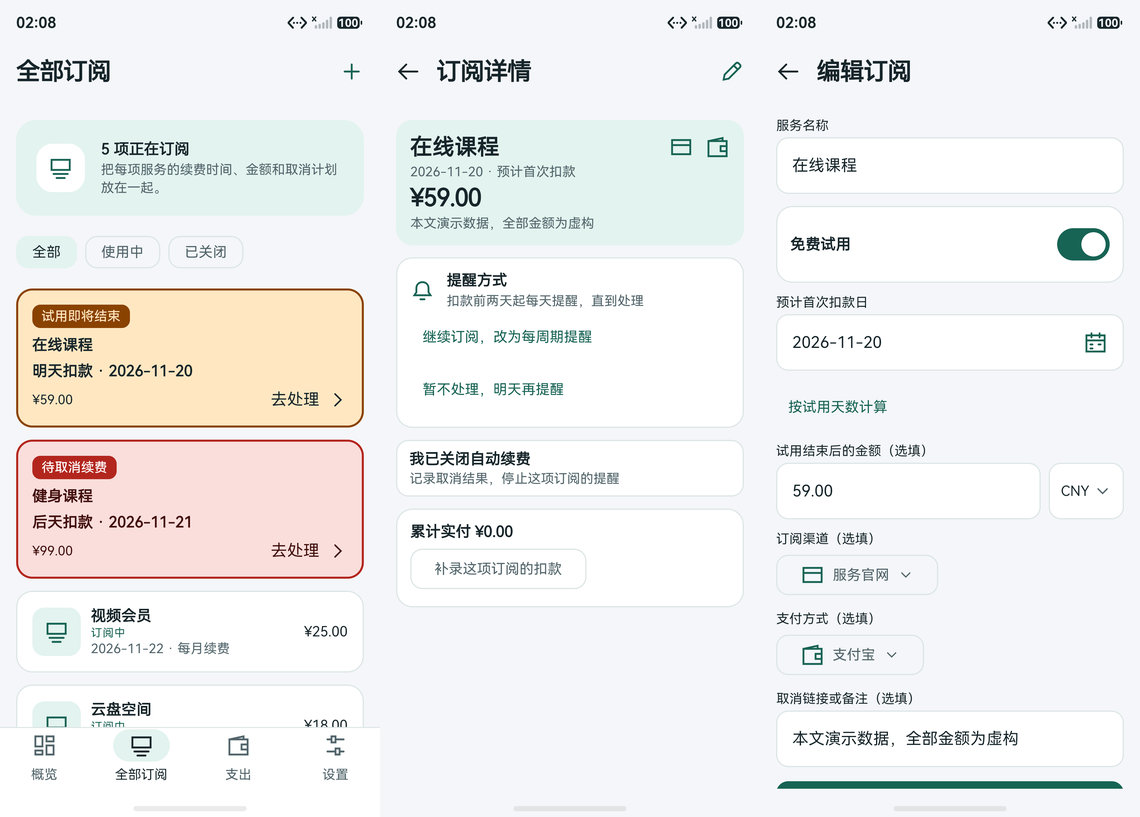
Step five: check three-platform behavior with one ledger
An empty screen confirms the app launches. Once you add data in different states, you can also check sorting, labels, amounts, totals, and how closed records render. This article uses the six fictional subscriptions below, plus eight extra payment entries. The full dataset is in the demo data files, with amounts in the currency’s smallest unit.
| Service | Status | Expected date | Amount | Cycle |
|---|---|---|---|---|
| Cloud Storage | Active | 2026-11-24 | CNY 18.00 | Monthly |
| Video Membership | Active | 2026-11-22 | CNY 25.00 | Monthly |
| Writing Assistant | Active | 2026-11-28 | USD 9.99 | Monthly |
| Online Course | Free trial | 2026-11-20 | CNY 59.00 | Monthly |
| Fitness Course | Cancellation planned | 2026-11-21 | CNY 99.00 | Monthly |
| Legacy Music Membership | Closed | 2026-11-05 | CNY 12.00 | Monthly |
Following the normal entry flow, create the three active records first, then turn on the “free trial” switch to create the Online Course, and finally use the cancel and close actions on the details screen to produce the other two states. On the spending screen, the plus button in the top right lets you add a payment. Pick the subscription, actual payment date, currency, and amount for each payment, then watch whether the overview and the per-service breakdown update together.
The screenshots use November 19, 2026 as the observation date, so the Online Course reads “charged tomorrow” and the Fitness Course reads “charged in two days”. If you reproduce this a few days later, those relative dates will shift on their own; check the absolute dates in the records when comparing data.
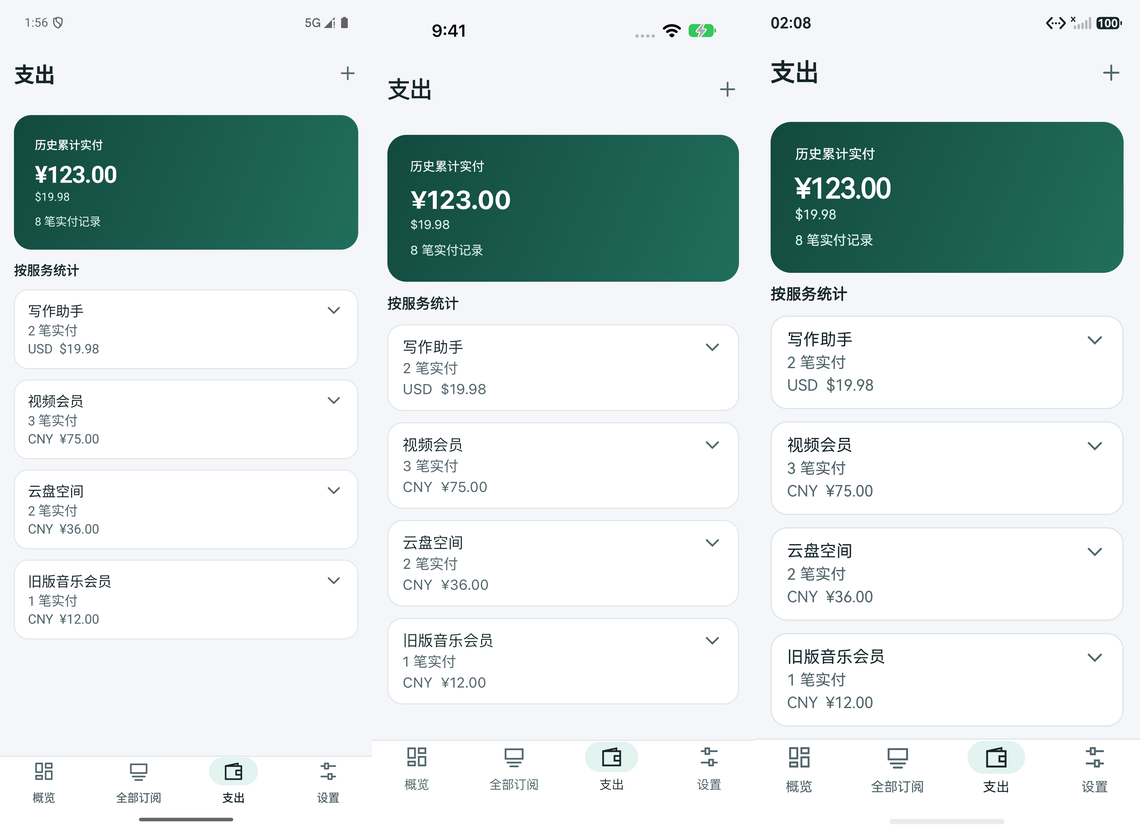
The spending screen totals payments that have already been entered. A subscription’s expected amount feeds the upcoming-charge prompts — each has its own data source. Trials and cancellation-planned records keep their expected charge date until the user takes the corresponding action and updates the status, so the forward-looking figures in the screenshots include those records too.
To prepare screenshots in bulk, the bundled Python tool generates a test database and a text ledger in a new directory.
Run python3 docs/articles/cmp-subtrack/tools/prepare_demo_ledger.py --output /tmp/subtrack-article-demo and it generates a test database and text ledger in a new directory.
The tool only writes into the new directory you specify. For everyday use, you can enter records by hand following the table. During capture, Android used a read-only simulator session, iOS used a dedicated simulator, and HarmonyOS had its ledger backed up first and the fictional records written through the temporary data-loader build. The original ledger and source were restored after capture, which keeps the screenshots consistent in content without disturbing existing development data.
Step six: wire up system capabilities and experimental sync
The settings screen on all three platforms offers account, appearance, reminders, and local data entry points. On a first pass, complete the local ledger work — add, edit, restart, verify spending — before checking reminder permissions and background execution.
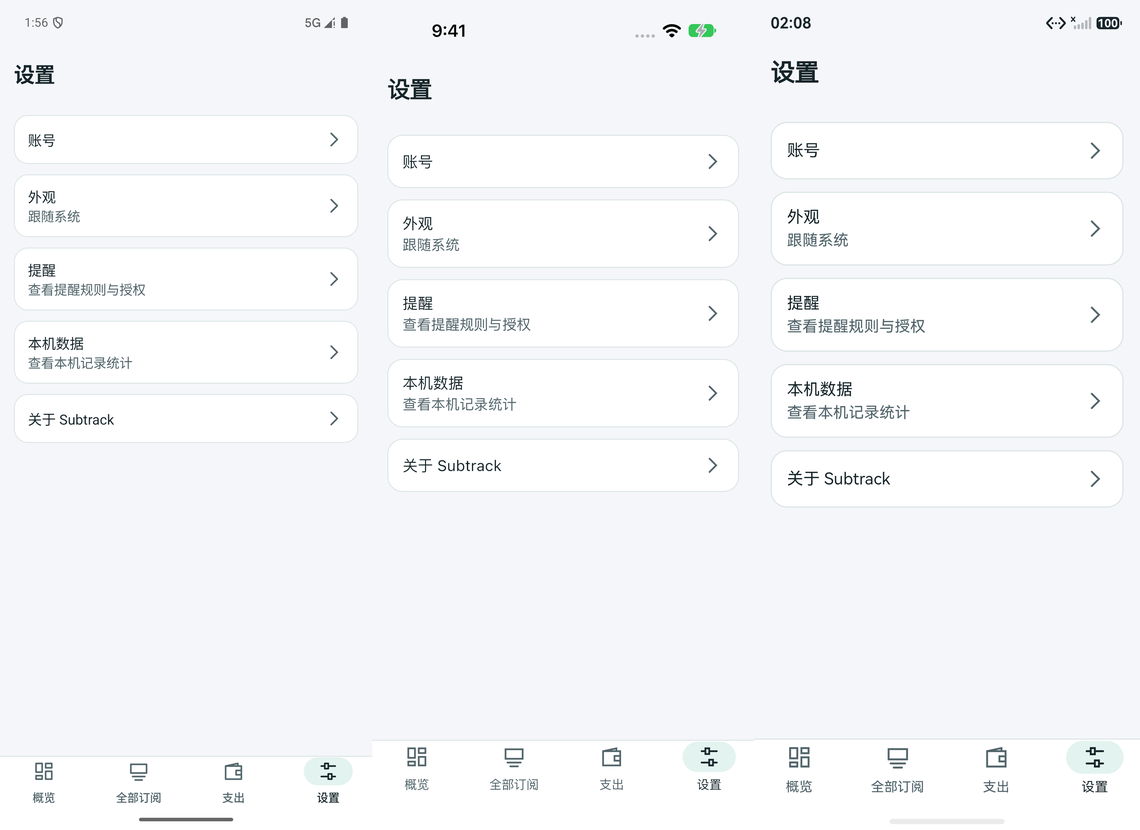
Subtrack is offline-first, and the build steps do not require an account.
To try sync, copy supabase.local.properties.example to supabase.local.properties, fill in your project URL and publishable key, and run the SQL migrations in filename order. For the email verification template, the Google OAuth callback, and backend permissions, see the sync documentation.
These client settings end up inside the app package; server keys and SMTP credentials belong on the server side. On HarmonyOS, after changing the sync configuration you need to republish the shared library and config files, then rebuild the HAP.
The account screen currently marks cloud sync as experimental. Round-tripping across devices, retrying while offline, conflict handling, account switching, and background scheduling on all three systems still need device acceptance testing. The screenshots in this article show the real local-ledger UI, and local test data was used to verify what it displays.
In the existing build checks, Android’s 34 unit tests pass, iOS passes 32 standalone tests, and the Keychain test still reports -25291. The offline screens in the images have already run on real simulators. When extending the account features, these tests carry over; add verification records for a signed app host and a real account on top.
Step seven: keep a repeatable check routine
After the first successful run on all three platforms, fix a small regression order. Open the overview and check expected charges against historical payments; go to the list and open a trial’s details; edit a record and restart; add a payment and return to the spending screen to check the total. Every time you change shared UI, walk that sequence on all three platforms.
Run builds and the existing tests from the project root.
./gradlew :composeApp:testDebugUnitTest
./gradlew :composeApp:assembleDebug
./gradlew :composeApp:iosSimulatorArm64Test
./gradlew :composeApp:publishDebugBinariesToHarmonyApp
The iOS test task needs a working Apple Silicon simulator environment. The HarmonyOS HAP, in turn, is built in harmonyApp after the shared library is published. Recording the source commit, dependency versions, device OS, and screenshots for each round gives later problems a clear basis for comparison.
This subscription ledger puts the shared UI, the amount and date logic, and three native hosts into a single project you can run step by step. As development continues, finish one complete business path in commonMain first, then verify persistence, permissions, and lifecycle separately. Only when every round walks the same test data through all three platforms do the gains of cross-platform development compound as features grow.